pallyzator
Level 1


Numarul mesajelor : 41
Varsta : 30
Localizare : BUCURESTI
Distractii : WeeD SmokeR
Data Inscrierii : 21/08/2009
 |  Subiect: Vtuning ->> Capota carbon Subiect: Vtuning ->> Capota carbon  Vin Aug 21 2009, 04:50 Vin Aug 21 2009, 04:50 | |
|  | Ok then, lets give this lovely standard Lexus
IS200 some street racer style in the form of a carbon fibre bonnet. | |  | To make the pattern, first step is to make a
new blank document. 12 across by 6 deep - then do max zoom (ctrl+0). | |  | Ok, first step in making the pattern is to
select the top left quarter with the rectangular marquee tool. Then select
the gradient fill tool, making sure that the colours are black (top) and
white (bottom as illustrated), then carefully fill from left to right to
acheive the effect shown in the example. Do the same in the bottom right
quarter, but drag from right to left. If done correctly you should achieve
the effect shown here. | | 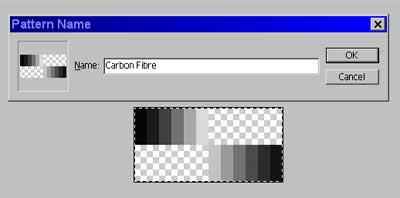 | The final step in making your CF pattern is to
define it. Go Edit>Define Pattern. Name as approprate and press ok. you can
now close the document without saving, the pattern is permanently stored in
Photoshop. | |  | Open up the image that you are working on and
make sure your base layer holding the car is selected. Carefully use the
polygonal lassoo tool to select the bonnet (or other part depending on what
you want to "carbonise"), copy and paste the part in to a new layer. For the
purpose of this tutorial I have de-saturated this layer and darkened it a
little. I find that this is a good method to use for making sure that the
whole part has been properly selected. | |  | Open up a new document, the size depends on
the size of the original that you are working on. In this case my original
was a 1024x768, so my new document was 1600x1200. You will have to
compensate accordingly for larger or smaller images. | |  | Make a new layer and hit Edit>Fill, select
your pre-defined pattern and hit OK. | |  | Use the rectangular marquee tool to select the
whole image, copy and pastein to a new layer above the bonnet on the
document with your chop. This new layer will be much too large for the car,
so ue the grab handles to squash the new layer in to place. This will help
the weave to get a natural looking size. It should now look something like
the image shown here. | |  | Now, to make sure that the carbon weave looks
realistic, select the whole CF layer and go to Filters>Distort>Twirl. | |  | The settings shown here should be adequate for
all applications. | |  | Now for the clever part, this tip can be used
in many situations. While on the Cf layer, hold ctril + click the layer that
holds the part you are adding carbon to, i.e. the bonnet. This automatically
selects the outline on the bonnet, but on the CF layer. Right click and do
select inverse. Hit delete and you should be left with the
perfect shape of the bonnet on the CF layer. | |  | On the layers box, make sure the CF layer is
selected and change the layer blending mode to
'multiply' | |  | Ok then, nearly finished. The final step is to
flatten the CF layer on to the bonnet layer (de-saturate now if you haven't
already done so). Then it is simply a case of lowering the brightness so
that the carbon looks more realistic. Sometimes you may have to play with
the contrast to achieve the desired effect. | |  | Finished! After all that work you should now
be able to go away and create awesome Carbon body parts quickly and easily!
If you feel adventurous then you can always play with colouring the bonnet
to create one off effects. | | | |
| |
|

